
VLC offers the option of using the Record button (as covered earlier) to allow users to save a portion of the video clip that is currently being played. However, the problem with using the Record button for cutting videos is that you need to actually play the entire portion of the video that you need. This makes it especially difficult to cut lengthy portions of a video. Moreover, exact start and stop times are difficult to maintain. This article offers a better way to cut videos with VLC media player that solves both these problems.

1) Open VLC media player and make sure that Repeat Media option is not selected as it will result in a loop being formed.
2) Play the video which you want to trim and note the start time in the video from where you want to obtain the trimmed video from and also note the end time up to which you want the video to be trimmed. Take the time in HH:MM:SS:MS format (Hours:Minutes:Seconds:Milliseconds format). For example, if you want to start cutting from 1 hour 2 minutes and 30 seconds and end cutting at 2 hours 5 minutes and 4 seconds in the video, the start time will be 01:02:30:000 and stop time will be 02:05:04:000. These values will be needed later.
3) Now, click on Media in the Menu bar.
4) In the dropdown menu, click on Convert/Save. Alternatively, you can press Ctrl+R shortcut key combination to directly reach Media options.
5) Click on the Add button on the right of the File selection box to load the video which you want to cut.
6) Tick show more options on the bottom left side of the dialog box to show extended options.
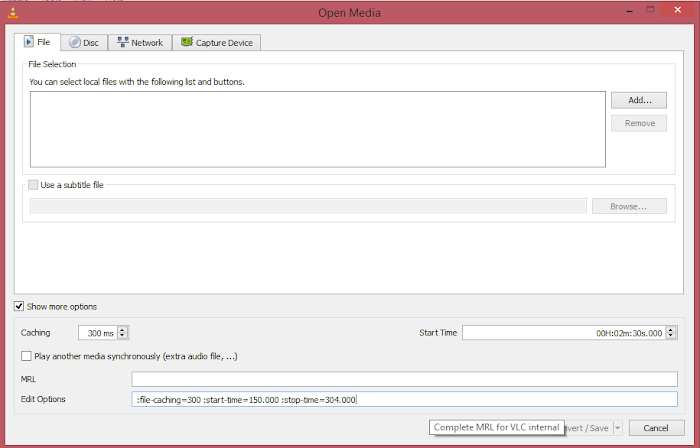
7) In the extended options, enter the start time which you noted earlier in HH:MM:SS:MS format in the Start Time field. Notice that in the Edit options field, a :start-time=### string will be added. There is also an option to add the stop time (only available in newer versions). Add the stop time in Stop Time field that you noted earlier. You need to add the stop-time in the same format as the Start time (HH:MM:SS:MS). After entering the stop time in Stop Time field, the Edit options field will start showing a ":stop-time=###" string. (For older versions of VLC, you need to manually add ":stop-time=###" string in the Edit options field with the stop time being in SS.MS format (Seconds.Milliseconds format)). For our example with older versions of VLC, the Edit Options text field should look like that in the image given below:-
8) Click on Convert/Save on the bottom right side and select an appropriate profile (Video or Audio) in the following dialog box. Select any preconfigured Video+Audio profile for the output to be a trimmed video with sounds. (Selecting an Audio only profile will remove video from the output. This is useful for extracting trimmed audio from a video.) You can also customize the output profile by clicking on the Settings icon on the right of the profile selection option to select from a range of encapsulation, video and audio formats. You can also create a new profile by clicking on the Create a new profile icon on the right of the Profile Selection option.
9) After selecting a profile, click on Browse in the Browse field to select the destination where your trimmed video will be saved. Also add a name for the output video in this step.
10) Click on Start to begin the cutting process.
VLC's progress bar will show progress. Do not close the player at this stage as it will result in the output video getting corrupted.
11) After the progress bar shows complete progress, you will have the trimmed video at the destination you selected.
Note: On some older PCs, after the cutting process is completed, VLC may become unresponsive. If that happens, just close VLC Media Player with the Task Manager. This will not affect the trimmed video.
The speed with which VLC cuts the video will depend upon your computer's specifications. A faster computer cuts quickly while slower PCs take a lot of time.
Formats supported:
VLC can be used to cut videos of all formats that it can play. This means that you can use VLC to cut videos of the following:-
How to use VLC as a video cutting tool
To cut videos in VLC, follow the steps given below:-1) Open VLC media player and make sure that Repeat Media option is not selected as it will result in a loop being formed.
2) Play the video which you want to trim and note the start time in the video from where you want to obtain the trimmed video from and also note the end time up to which you want the video to be trimmed. Take the time in HH:MM:SS:MS format (Hours:Minutes:Seconds:Milliseconds format). For example, if you want to start cutting from 1 hour 2 minutes and 30 seconds and end cutting at 2 hours 5 minutes and 4 seconds in the video, the start time will be 01:02:30:000 and stop time will be 02:05:04:000. These values will be needed later.
3) Now, click on Media in the Menu bar.
4) In the dropdown menu, click on Convert/Save. Alternatively, you can press Ctrl+R shortcut key combination to directly reach Media options.
5) Click on the Add button on the right of the File selection box to load the video which you want to cut.
6) Tick show more options on the bottom left side of the dialog box to show extended options.
7) In the extended options, enter the start time which you noted earlier in HH:MM:SS:MS format in the Start Time field. Notice that in the Edit options field, a :start-time=### string will be added. There is also an option to add the stop time (only available in newer versions). Add the stop time in Stop Time field that you noted earlier. You need to add the stop-time in the same format as the Start time (HH:MM:SS:MS). After entering the stop time in Stop Time field, the Edit options field will start showing a ":stop-time=###" string. (For older versions of VLC, you need to manually add ":stop-time=###" string in the Edit options field with the stop time being in SS.MS format (Seconds.Milliseconds format)). For our example with older versions of VLC, the Edit Options text field should look like that in the image given below:-
8) Click on Convert/Save on the bottom right side and select an appropriate profile (Video or Audio) in the following dialog box. Select any preconfigured Video+Audio profile for the output to be a trimmed video with sounds. (Selecting an Audio only profile will remove video from the output. This is useful for extracting trimmed audio from a video.) You can also customize the output profile by clicking on the Settings icon on the right of the profile selection option to select from a range of encapsulation, video and audio formats. You can also create a new profile by clicking on the Create a new profile icon on the right of the Profile Selection option.
9) After selecting a profile, click on Browse in the Browse field to select the destination where your trimmed video will be saved. Also add a name for the output video in this step.
10) Click on Start to begin the cutting process.
VLC's progress bar will show progress. Do not close the player at this stage as it will result in the output video getting corrupted.
11) After the progress bar shows complete progress, you will have the trimmed video at the destination you selected.
Note: On some older PCs, after the cutting process is completed, VLC may become unresponsive. If that happens, just close VLC Media Player with the Task Manager. This will not affect the trimmed video.
The speed with which VLC cuts the video will depend upon your computer's specifications. A faster computer cuts quickly while slower PCs take a lot of time.
Formats supported:
VLC can be used to cut videos of all formats that it can play. This means that you can use VLC to cut videos of the following:-
Container formats: 3GP, ASF, AVI, DVR-MS, FLV, Matroska (MKV), QuickTime File Format, MP4, MPEG-2 (ES, PS, TS, PVA), Raw DV, MXF, VOB, RM, DVD-Video, VCD, SVCD, DVB
and
Video formats: Cinepak, Dirac, DV, H.263, H.264/MPEG-4 AVC, H.265/MPEG HEVC, HuffYUV, Indeo 3, MJPEG, MPEG-1, MPEG-2, MPEG-4 Part 2, RealVideo 3 & 4, Sorenson, Theora, VC-1, VP5, VP6, VP8, VP9, DNxHD, ProRes and some WMV.
 About
About


Reader Comments
Great tip. Thanks.
Thanks for this - I was overthinking the whole process when all the time I had VLC installed. It is a very powerful tool and even though I've used it for playback for years I am still finding little extra features!
One problem though. The finished video has no display, just audio.
I am making a montage video comprising of lots of small gaming clips/videos that are joined together. A lot of the clips need trimming down to just show the main part.
So for example, video number one: I need to take 20 seconds of boringness off the start. I followed this guide and cut 20 seconds off. I selected where to save it and selected the format as [720p mp4 tv/device] because this format has worked before on straight format conversions and will play on pretty much everything.
The end result is just a black screen with audio - no display. Although the video is shorter. VLC isn't still processing so it is apparently done.
Any tips would be much appreciated :)
For some reason I had to click on play to finalize the process. Thank you for the directions.
Using this method, only audio was saved in the output file. I had to use the "babysitting" method to obtain video + audio. Not sure what the problem was. Running VLC on Win10, mp4 input file.
Pressing the record button to start and stop recording at the beginning and ending point of the clip works as expected.
However, using the Convert/Save option only produces an audio file for me.
The audio file starts and stops at the desired points, but I want the video also.
I've tried it multiple times, with the same results.
Any suggestions?
@RaserSharp @Anonymous: Try selecting a different video profile. It appears that VLC has some issues while processing videos from certain profiles.
Post a Comment
Make your opinion count by posting a comment.