
VLC, the free and open source media player is great at playing media of even the most obscure formats. However, that is not all it can do. It can be used to easily convert videos from one format to other. Converting videos with VLC media player is pretty fast and is in the league of most premium video converters in terms of quality. It can also be used to resize videos from one size to other for when you need to shrink videos to fit in your mobile devices. It can also serve as a quick video cutting tool.

1) Open VLC media player. To avoid forming a loop, ensure that Repeat Media option is disabled.
2) Click on Media in the Menu bar.
3) In the dropdown menu, click on Convert/Save. Alternatively, you can press Ctrl+R to directly reach Media options.
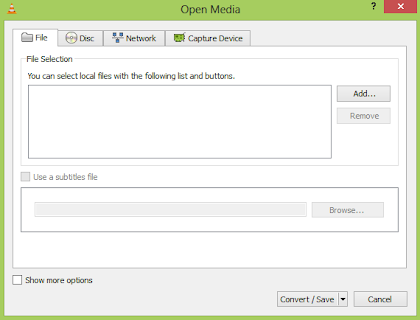
4) Click on the Add button on the right of the File selection box to load the video whose format you want to change.
5) Click on Convert/Save button.
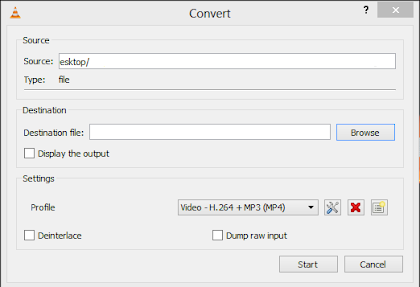
6) In the Profile selection option under the Settings>Convert field in the following dialog box, select a pre-configured profile for the output or customize the profile by clicking on the Settings icon on the right of Profile selection option. You can select from a range of encapsulation, video and audio formats in the following dialog box if you wish to customize the output profile. You can also create a new profile by clicking on the Create a new profile icon on the right of the Profile Selection option.
7) Click on Browse to select the destination where your converted video will be saved.
8) Click on Start to begin conversion.
9) VLC's progress bar will show progress. Do not close the player when it is converting video as it will result in the output video getting corrupted.
The speed with which VLC converts videos depends upon your computer's specifications. A faster computer converts faster while slower PCs take a lot of time. At the end of the conversion process, you will get the video in the format that you have selected in step 6.
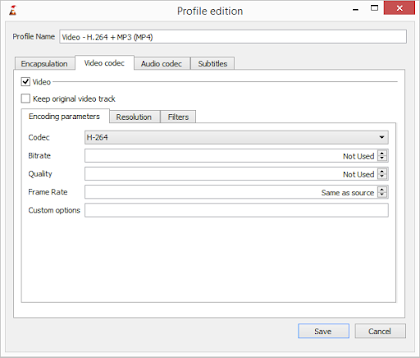
1) Select to customize the profile in step 7 in the conversion process described above by clicking on the Settings icon next to the Profile selection option.
2) In the next dialog box, go to the Video codec tab.
3) Tick the Video checkmark.
4) Go to the Resolution tab.
5) Inside the Resolution tab, enter any one of desired width, height or Scale value that you deem fit for your needs. After that, just convert the video as you normally would. This would result in the output video having the dimensions that you specified.
Important: 1) For maintaining the correct aspect ratio, VLC asks you to enter any one of height, width or Scale option while leaving the other two unchanged. The relation between height and width of any video is dependent on its aspect ratio and for best results, it is advisable to add only one of height, width or Scale value and let the other values be decided by the aspect ratio.
2) The Scale option is used to scale the video up or down (increasing or decreasing resolution of the video) by a fixed factor without the need to enter height or width.
Related: A better way to cut videos with VLC.
Convert Videos with VLC Media Player
To convert videos with VLC media player, follow the steps given below:-1) Open VLC media player. To avoid forming a loop, ensure that Repeat Media option is disabled.
2) Click on Media in the Menu bar.
3) In the dropdown menu, click on Convert/Save. Alternatively, you can press Ctrl+R to directly reach Media options.
4) Click on the Add button on the right of the File selection box to load the video whose format you want to change.
5) Click on Convert/Save button.
6) In the Profile selection option under the Settings>Convert field in the following dialog box, select a pre-configured profile for the output or customize the profile by clicking on the Settings icon on the right of Profile selection option. You can select from a range of encapsulation, video and audio formats in the following dialog box if you wish to customize the output profile. You can also create a new profile by clicking on the Create a new profile icon on the right of the Profile Selection option.
7) Click on Browse to select the destination where your converted video will be saved.
8) Click on Start to begin conversion.
9) VLC's progress bar will show progress. Do not close the player when it is converting video as it will result in the output video getting corrupted.
The speed with which VLC converts videos depends upon your computer's specifications. A faster computer converts faster while slower PCs take a lot of time. At the end of the conversion process, you will get the video in the format that you have selected in step 6.
Resize and shrink videos with VLC media player
Resizing the video involves making minor changes in the steps followed in conversion.1) Select to customize the profile in step 7 in the conversion process described above by clicking on the Settings icon next to the Profile selection option.
2) In the next dialog box, go to the Video codec tab.
3) Tick the Video checkmark.
4) Go to the Resolution tab.
5) Inside the Resolution tab, enter any one of desired width, height or Scale value that you deem fit for your needs. After that, just convert the video as you normally would. This would result in the output video having the dimensions that you specified.
Important: 1) For maintaining the correct aspect ratio, VLC asks you to enter any one of height, width or Scale option while leaving the other two unchanged. The relation between height and width of any video is dependent on its aspect ratio and for best results, it is advisable to add only one of height, width or Scale value and let the other values be decided by the aspect ratio.
2) The Scale option is used to scale the video up or down (increasing or decreasing resolution of the video) by a fixed factor without the need to enter height or width.
Cut videos with VLC media player
To crop videos with VLC media player, go to the Menu bar and click on View menu option. Inside it, check Advanced Controls. This will result in a few extra buttons over the normal toolbar. Play the video of your choice and press the Record button (from the newly added buttons) at the point in the video from where you want to start. Then, again press this button when the video reaches the point at which you want to stop the output video. The cut video will automatically be saved in your Videos library. It is located at Libraries/Videos in Windows 10, Windows 8.1, Windows 8, Windows 7 and Windows Vista. In Windows XP, it is located at My Documents\My Videos. You can use the Frame by Frame button to get a high degree of accuracy. You need to install the newer versions of this program as older versions do not support this.Related: A better way to cut videos with VLC.
 About
About


Reader Comments
The record button isn't very accurate. When I hit it, even when I use the frame-by-frame feature, the recorded video starts a few seconds later than the place I started recording. How do I fix this?
Download the latest version. It might be a problem with the version installed on your PC.
I'm so amazed at the great job you're doing in here. At last, a good well designed website running under Blogger platform. I mean you deserve a handshake!
MSword23, you can use start and stop-time to cut videos, like (e.g.: for start=50s and stop=1m:10s):
:start-time=50.000 :stop-time=70.000
Cutting (or what I call Trimming) an AVI video gives me only an audio recording. I thought this was because I was running VLC on my mac so I have now tried running it on a VISTA Windows machine and have the same problem. THe file extension i get on the trimmed file is .AVI-.wav in case that helps get someone to figure out why it doesn’t work.
@Anonymous: Incorrect settings are the reason why it is being saved as a .WAV file. Check your settings.
I always have searched a lot of converter tools but VLC already have these features. Thanks a lot.
Post a Comment
Make your opinion count by posting a comment.